Userbrain works with any prototyping tool that allows you to share a public link. Simply put, if you can link to it, you can test it.
Here's how to test your Sketch prototypes with Userbrain:
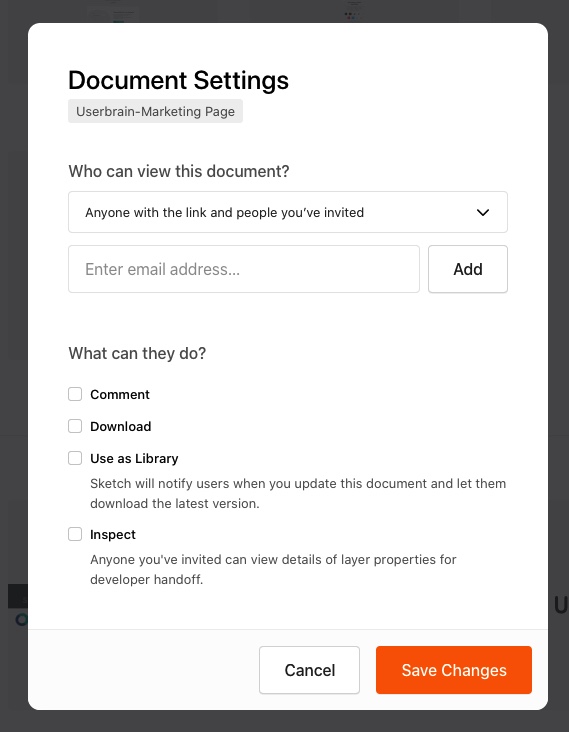
View your document in Sketch Cloud.
Open the Document Settings by hovering over the document you wish to share and click on the More options icon (the three dots in the top-right corner)
When you get to "Who can view this document?" Select "Anyone with the link and people you've invited"
Make sure that all the checkboxes below are deselected.
How to disable hotspots
Clicking anywhere on the screen while viewing your prototype will highlight any Hotspots or Links. To share a Prototype preview without hotspots enabled, hover over the Prototype thumbnail in the documents overview, click on the "…" button and choose "Copy link to Prototype with Hotspots disabled"
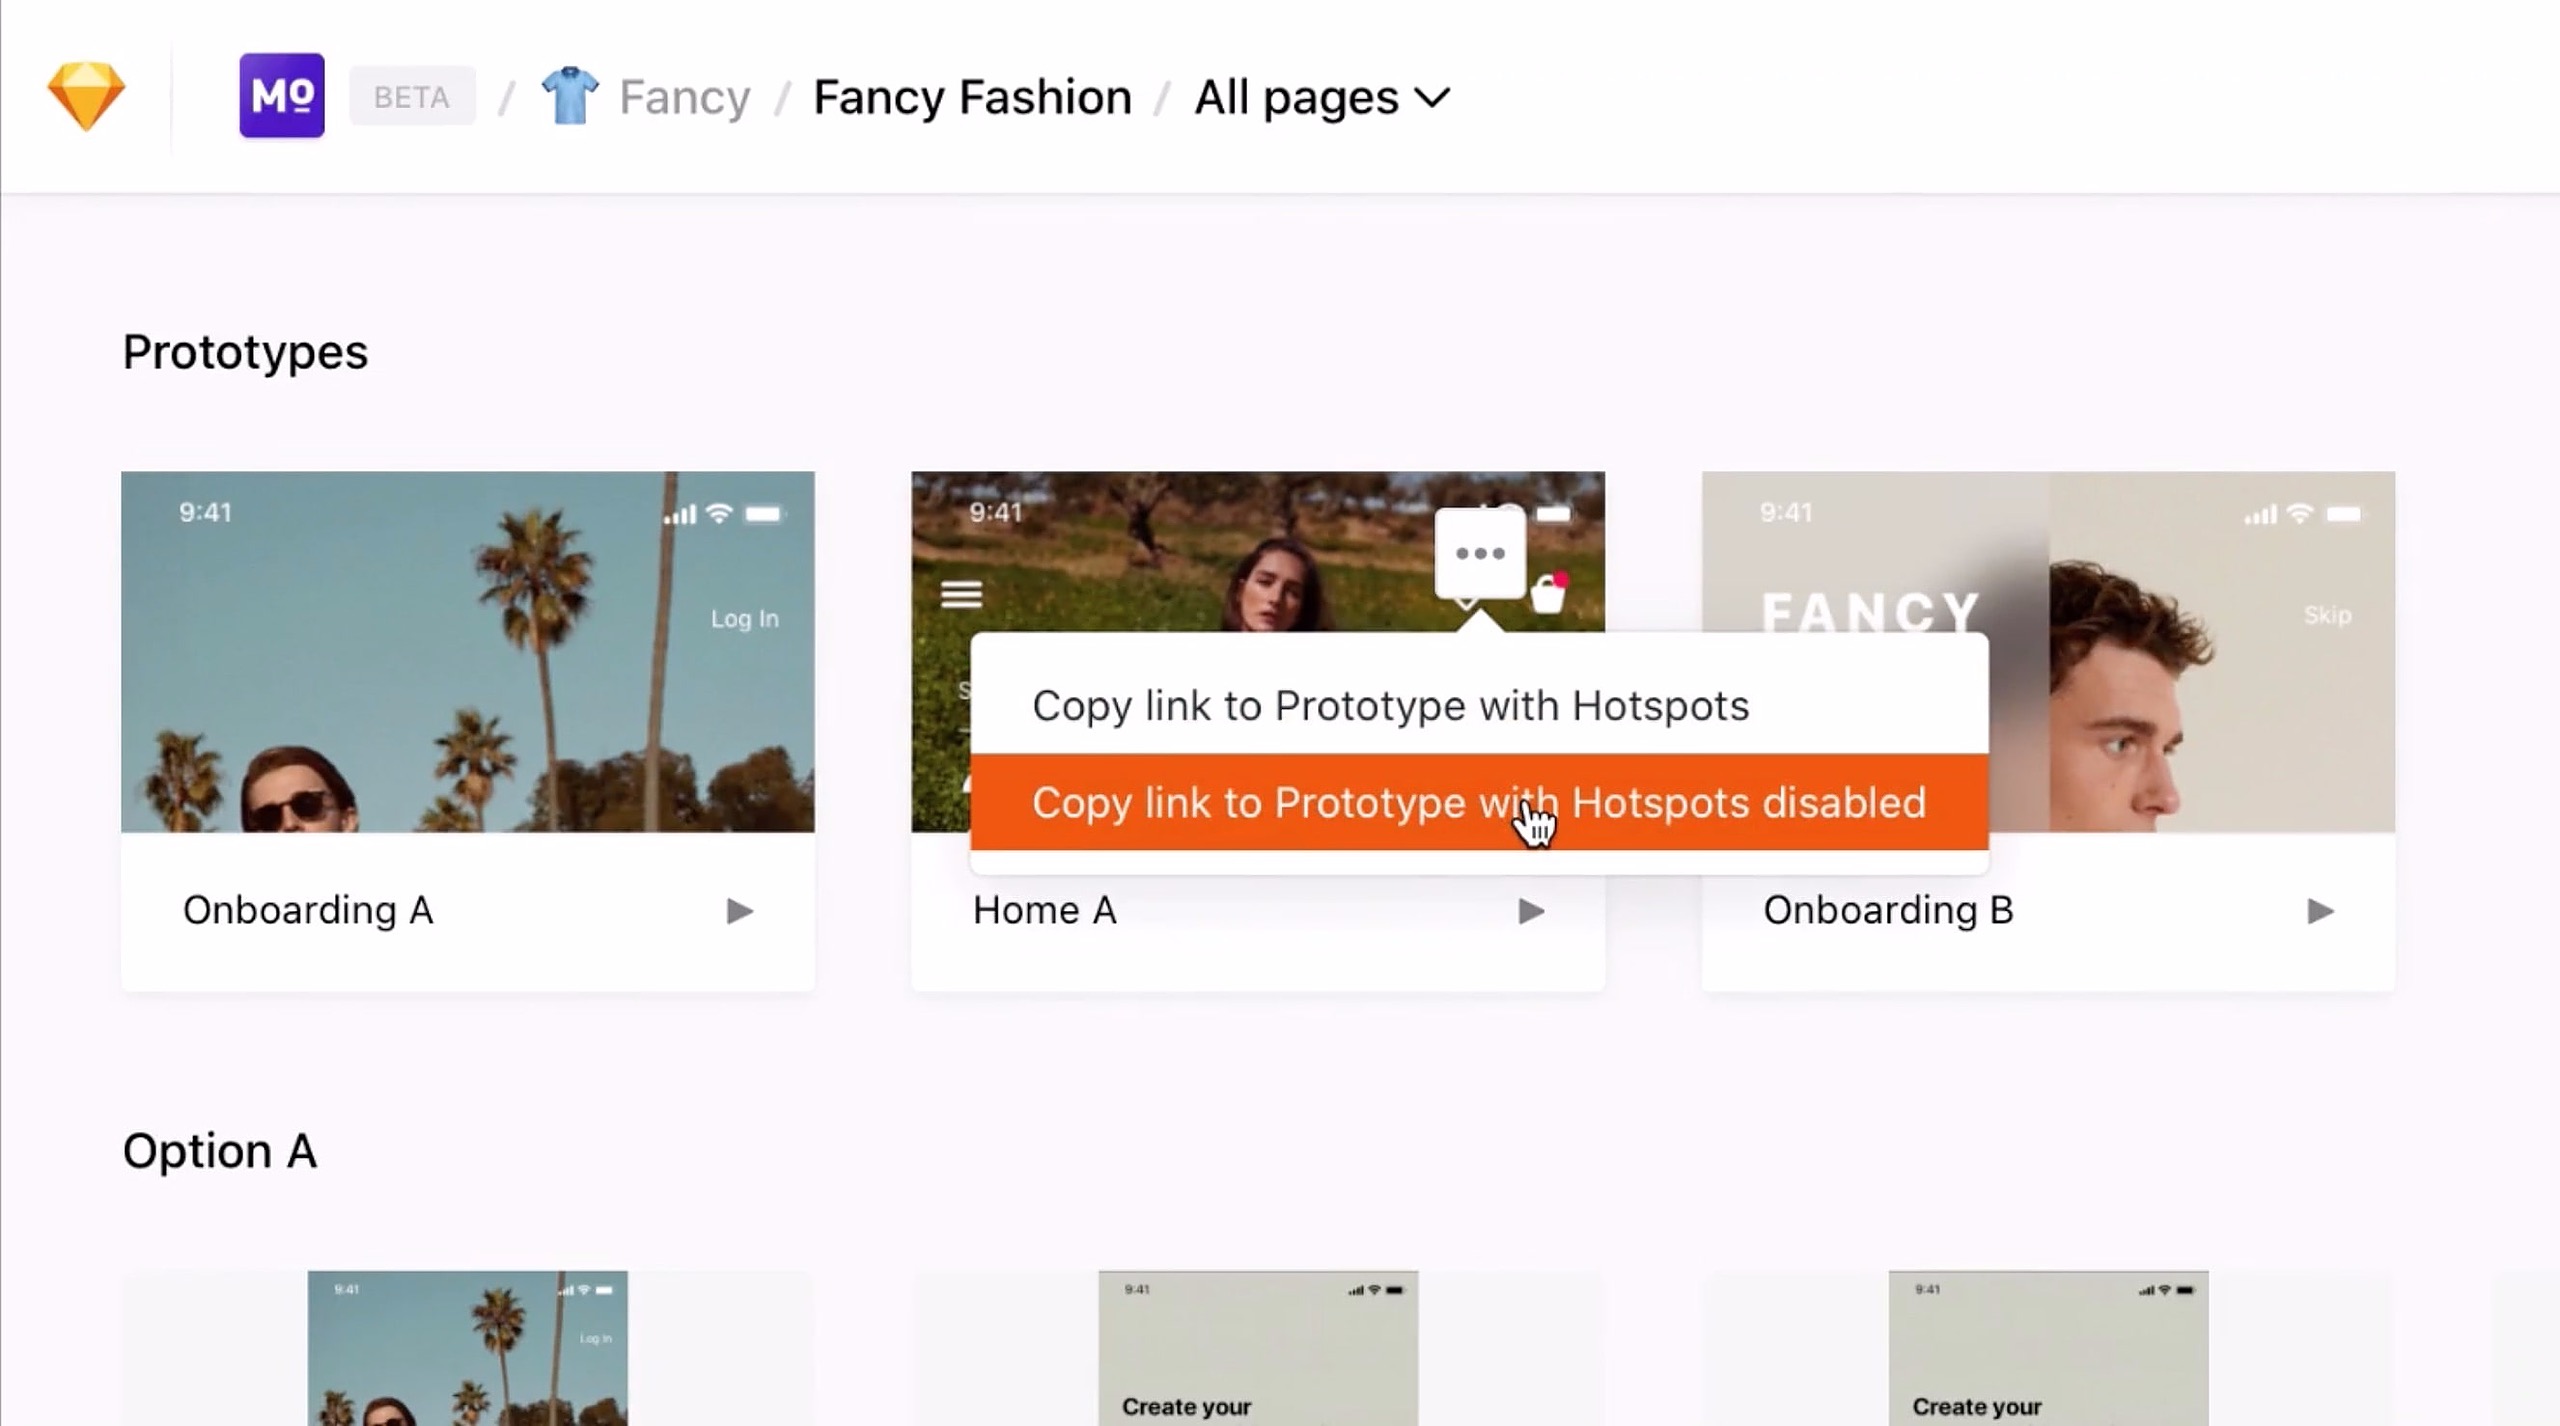
Screenshot: sketch.com
If for any reason there's a problem while using Sketch cloud, you can test your Sketch prototypes on other tools as well.
First, you need access to one of these collaborating/prototyping tools in addition to Sketch:
InVision
Framer
Zeplin
Flinto Lite
Axure
Adobe XD
How to test with access to Sketch and InVision
Design with Sketch.
Drag and drop your designs into InVision, or simply sync them from Dropbox, Box, or InVision Sync.
How to test with access to Sketch and Framer
Select the Sketch layers, groups, or artboards that you’d like to paste into Framer X and hit
CMD + C.Open a new Framer X document and simply hit
CMD + Vto instantly paste all of your designs.Upload your design to Framer Cloud by clicking on the cloud icon in the top right corner and then clicking «Upload».
Export a web preview
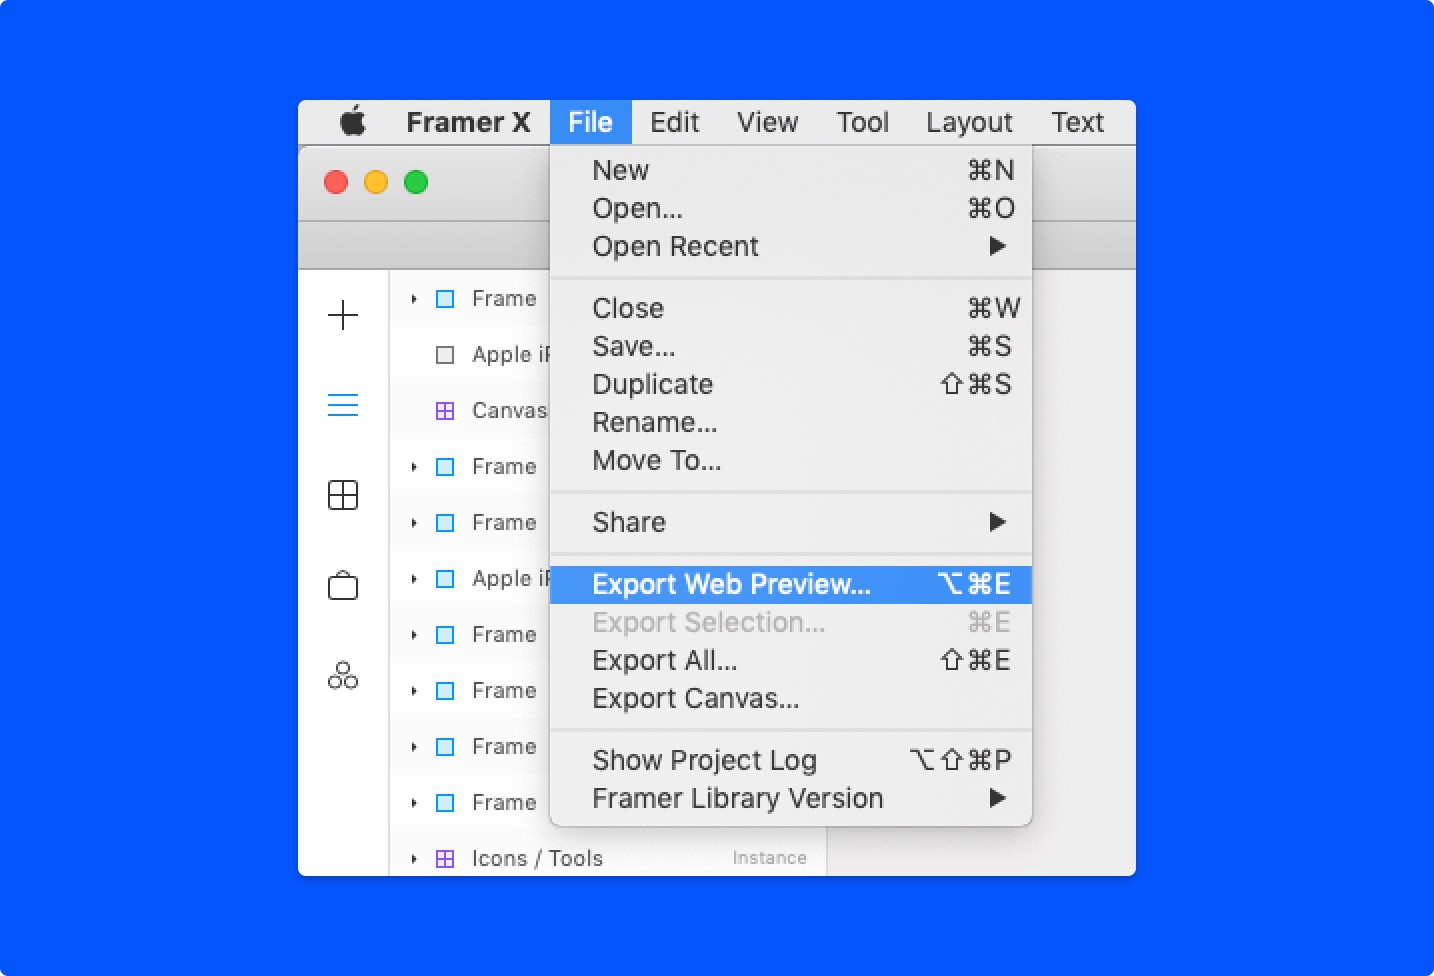
Screenshot: framer.com
Upload the folder to a service that can host static websites. Use a personal or company server.
You can also upload your folder at Netfiy Drop or ZeitNow, find out more here.
How to test with access to Sketch and Zeplin
You'll have to export your Design made in Sketch to Zeplin to be able to export designs, you need to download the desktop app.
Download the desktop app.
Select any layer/artboard in your Sketch file.
Press ⌃⌘E or use the menu up top “Plugins > Zeplin > Export Selected Artboards…” to start export process.

Screenshot: support.zeplin.io
Click the "Share" button in your Zeplin project dashboard.
Click on the “Enable” button under the Scene section.
Copy the link and paste it into Userbrain.
Disable screen links in Zeplin
From the project Dashboard, click the “Share” button on the right panel. Then click on the «...» button and select "Unshare". More information on how to set up links in Zeplin you can find here.
How to test with access to Sketch and Flinto Lite
This guide applies to Flinto Lite, the Mac App of Flinto.
Open your document in Sketch.
Go to Flinto and click on the "Import" toolbar button and choose "Sketch".
The Sketch document will be imported into your current Flinto document.
To get a link to share, press the "Share and install" button to send your prototype to your phone, or to someone else.
Set up a quick link.
The downside with a quick link is if you refresh this link, anyone who installed the prototype using that link will need the new one sent to them.
Paste the link into Userbrain.
How to test with access to Sketch and Axure
First, you'll have to import your Sketch file into Axure, find out more here.
Open the file in Axure RP and click the "Share" button at the top-right of the UI.
Make sure Comments are disabled
Click the "Publish" button
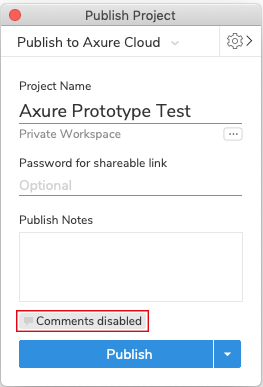
Screenshot: axure.com
A window will pop up at the bottom right of the screen.
Copy the link and paste it into Userbrain.

For detailed information visit the axure blog.
How to test with access to Sketch and Adobe XD
Open the prototype that you want to test in Adobe XD.
Specify a title for your prototype.
Click Share button and at the View Setting select "Custom"
Set the following options: Disable "Allow comments" and disable "Show hotspot hints"
Click "Create link" button
Copy and Paste the generated URL into Userbrain

Find out more about link settings in Adobe XD here.